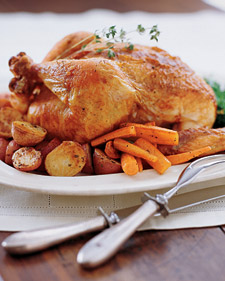
On a social media site yesterday I saw a recipe for “Tater Casserole” which included such ridiculously combined ingredients as one can of cream of mushroom soup, one bag of tater tots, 2 pounds of ground beef and a 1/4 cup of ranch dressing. As I read the heart stopping list out loud to Mr. MVP I could feel my arteries clogging in protest. Come on people, there is a better way to feed our families and it’s really easy!
Roasted Chicken (Simplified)
Tools
1. The roasting pan is an essential piece of equipment for roasting a chicken because let’s face it, as much as we’d like to just shove the bird directly into the oven, we simply cannot.
2. A roasting rack, while not completely necessary, is absolutely worth the $8.00 investment if you plan on having roast chicken more than just one time.
3. Aluminum foil will make everything easier, from covering the pan, so clean-up is simple, to covering the bird, so eating is delicious! I prefer the heavy-duty foil from Sam’s Club, but I also recycle everything after it’s been rinsed off, so foil is a personal decision.
4. A thermometer can guide you through the, “is it done?” phase of cooking anything and everything. If you don’t already have one, save your pennies and buy one.
Ingredients
One 4 to 5 pound whole chicken
1 tablespoon butter, melted (optional)
3 or 4 medium cloves of garlic
2 teaspoons basil
1 teaspoon salt
1 teaspoon sage
1 teaspoon thyme
Pepper (as much or little as you want, it honestly is up to you)
1. Preheat oven to 375 degrees. Cover the roasting pan with foil to make clean-up simple and place the roasting rack inside the pan. If you opted out of the rack, don’t worry.
2. Clear out the sink of any dishes and move any extra things off the kitchen counters. Grab a plastic grocery bag (garbage bag) for chicken parts, paper towels, and any trash. If they are available grab some antibacterial wipes or have soap and clean towels on hand. When working with raw chicken it is always better to be safe, than sorry.
3. Take the chicken out of the packaging and rinse with cold water, both inside and out. Remove any innards and the plastic thermometer if your chicken came with one and continue rinsing.
3. Pat the chicken dry with paper towels (this step is very important to get a crispy skin) and place it breast side up on the roasting rack.
4. Place the packaging, plastic thermometer, innards, and any cuttings in the trash bag. Wipe down the counter tops, the sink and wash any surfaces that might have come into contact with raw chicken. Now, wash those hands!
5. If you are using the butter, melt it in the microwave in a small dish and with a brush (or spoon) apply evenly over the chicken.
6. Next, crush the garlic either with a garlic press or finely chop it with a knife and rub it evenly over the chicken.
7. In a small bowl mix the herbs and rub them evenly over the bird.
8. Put the pan in the oven and roast the chicken, uncovered, for one hour. Using your thermometer, check the temperature. A finished chicken will be 165 degrees in the middle of the breast. If the bird isn’t done continue cooking for fifteen minute increments until it reaches 165 degrees.
9. Once the chicken reaches 165 degrees remove it from the oven and cover tightly with foil and let it rest for ten to twenty minutes. This will give you an opportunity to mash your potatoes, roast the brussel sprouts, and get your family to the table.
One 5 pound chicken, 2 cups of brown rice and one small roasting pan of brussel sprouts will feed Mr. MVP and I Saturday dinner with enough leftovers for his lunch through the week and there is absolutely no cream of mushroom soup anywhere.


